Tricotin essentials: everything you need to make a knitted name
- Aug 10, 2025
- 5 min read
Updated: Sep 2, 2025

If you’ve ever seen those gorgeous yarn-wrapped names and shapes made with wire and thought, “I wish I could do that!”, well you are at the right place! I’m Lucie, a French maker who’s been twisting wire and knitting icord to make knitted names (also names 'Tricotin names') for over eight years. When I first started, there were no tutorials, no tips on instagram, no blog articles… just me, my yarn, and a lot of trial and error. Now, I’m here to share all I learnt, my tricks and my secrets so you can skip the struggle and jump straight to creating your own beautiful pieces!
Let’s start right at the beginning!
This beautiful craft is called Tricotin, also known as French knitting or knitted wire art. It’s really easy to learn, and you’ll be surprised how quickly your skills can improve (especially if you follow my blog articles 😉). All you need is to get the right tools, learn how to knit your i-cord (that knitted tube that goes around the wire), and master shaping wire into your chosen words or designs. Once you’ve got those basics, your creativity can truly run wild! There’s no (almost) limit to what you can make!

Here’s my breakdown of the essentials you’ll need to get started (plus a few “nice-to-haves” that will make the process smoother and faster.)
1. Knitting Mill (or French Knitting Doll)
The knitting mill is what creates your i-cord (the long, hollow knitted tube that will wrap around your wire.)
There are a few types to choose from:
• Manual knitting doll: Perfect for beginners or occasional makers, this classic tool works by looping yarn around pegs and using a small hook. They’re inexpensive and easy to find in most craft stores. The only catch? You’ll need patience, it’s a slow process, so maybe save it for small projects or a relaxing afternoon.
• Mechanical knitting mill: Think of it as the upgraded version of the manual doll. You simply turn a handle and the cord knits itself… well, almost! It can take a little practice to get it running smoothly, and it might misbehave at first (don’t throw it out the window just yet!). Once you get the hang of it, you’ll be hooked. I’ve posted a few reels full of tips to help you master it quickly 😉. You’ll find mechanical mills in craft stores or online (especially Amazon). Skip the super-cheap versions! They tend to jam and break quite easily and quickly. My personal favourite is the Tulip. The Prym is great too ( but..... I prefer the Tulip!)
• Electric knitting mill: The Rolls-Royce of knitting mills! As Tricotin grows in popularity, some brands now make electric mills that knit your i-cord for you, no handle-cranking required! They’re a dream for production work, but the higher price tag makes them a small investment. If you’re running a small business, they’re worth considering. If you’re just crafting for fun, the mechanical version will do the job.
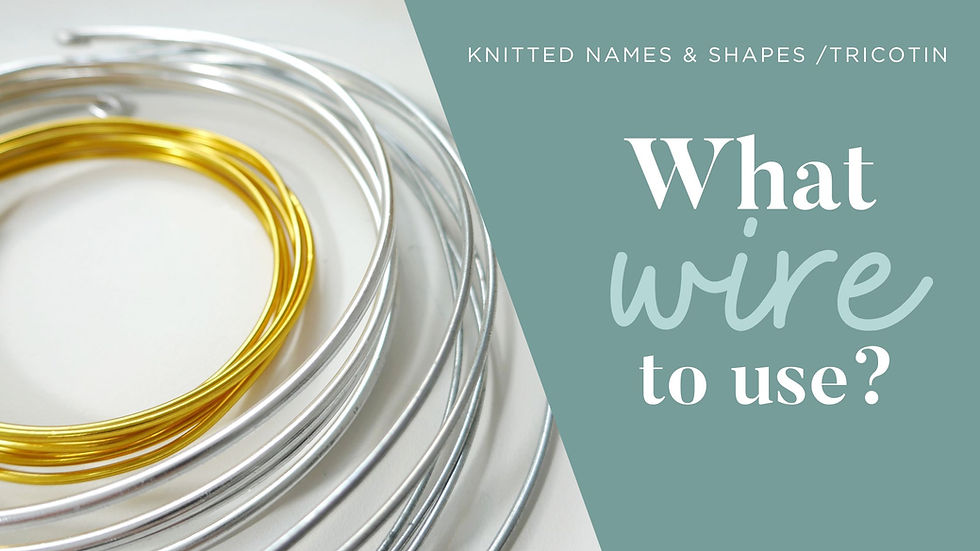
2. Wire
Wire is what gives your knitted name its shape and structure. Your choice of wire affects flexibility, durability, and how easy it is to bend. If your wire is too thin, it will poke through the yarn and your name will curve. If it’s too thick, it will be hard to shape. The two most popular choices for knitted names are 3 mm aluminium wire and 2 mm galvanised steel wire.
3mm Aluminium wire: is soft and easy to bend. It’s strong enough to keep the shape. It’s perfect for beginners!
2mm Galvanised steel wire: is stronger and holds its shape better! it's ideal for names but be prepared for a workout. It’s harder to bend, especially for tight curves or intricate shapes. I recommend it if you want super-durable pieces for selling or long-term display.
If you’re just starting out, stick with aluminium until you’re comfortable. When you’re ready to level up for more professional, long-lasting results, switch to galvanised steel.
3. Yarn
Your yarn choice matters for both practicality and looks, it affects how smoothly your i-cord knits, how well it covers the wire, and the overall finish of your piece.
• Acrylic yarn: Affordable, easy to find, and available in endless colours. It slides smoothly over the wire, making it a joy to work with. This is what I personally use for most of my creations.
• Cotton yarn: Slightly firmer with less stretch, which gives a neat, crisp finish. Great if you want very defined stitches or a more polished look.
Tip: Stick to 8-ply (DK weight)! Anything thicker can jam the mechanism, and anything too thin might not cover your wire fully.
4. Pliers
Pliers are essential for bending your wire neatly, shaping your letters, and trimming the ends. The right tool will make your work faster, neater, and much less frustrating.
Round-nose pliers: Help create smooth, curved letters without kinks.
Flat-nose pliers: Perfect for making crisp angles or holding wire firmly.
Wire cutters: To snip your wire to size.
Some pliers combine two functions in one tool, for example, flat-nose pliers with built-in wire cutters. These are handy if you want to save space in your tool kit, but separate tools often give you more control for detailed shaping.
5. Universal Glue (optional)
Using glue to secure your wire into the icord is optional but I personally recommend! Here is the one I use and recommend. You can try with another barnd or kind of glue but don't use hot glue! It won't work properly and will look horrible.
6. Needle
A needle with a large enough eye to easily thread your yarn is needed to sew the ends of your i-cord. I use these.
7. Scissors
To cut your icord to size.
8. Templates (Optional but highly recommended)
Alphabet templates guide you when bending your wire so every letter is nicely aligned, the same size and style.
You can:
Print ready-made templates (like my alphabets templates here)
Draw your own letters on paper to scale.

That’s it!
Now you know all the essentials you need to start making your own knitted names. If you’re not sure where to begin, I recommend diving into my other articles and following me on Instagram for more tips, tricks, and inspiration. And if you’d like to speed up your progress, my ready-to-use templates will help you skip the trial-and-error stage. Of course, if you ever get stuck, just send me a message, I’m always happy to help!

Oh and one last thing! If you’re wondering where to find the best tools and supplies I use and recommend, be sure to visit my Learn page! I’ve gathered all my favourite yarns, wires, knitting mills, and more in one place for easy shopping. Some links are affiliate links. This means if you choose to buy through them, I may earn a small commission (at no extra cost to you!) It’s a lovely way to support my work and help me keep sharing tips and tutorials with you. Thank you so much for your support!
I hope you like this little article! Feel free to tag me on your creations or send me some photos so I can share them! I always love to see!
xx Lucie

Comments